经过 Spring Boot 的整合封装与自动化配置,在 Spring Boot 中整合Redis 已经变得非常容易了,开发者只需要引入 Spring Data Redis 依赖,然后简单配下 redis 的基本信息,系统就会提供一个 RedisTemplate 供开发者使用,但是今天松哥想和大伙聊的不是这种用法,而是结合 Cache 的用法。Spring3.1 中开始引入了令人激动的 Cache,在 Spring Boot 中,可以非常方便的使用 Redis 来作为 Cache 的实现,进而实现数据的缓存。
# 工程创建
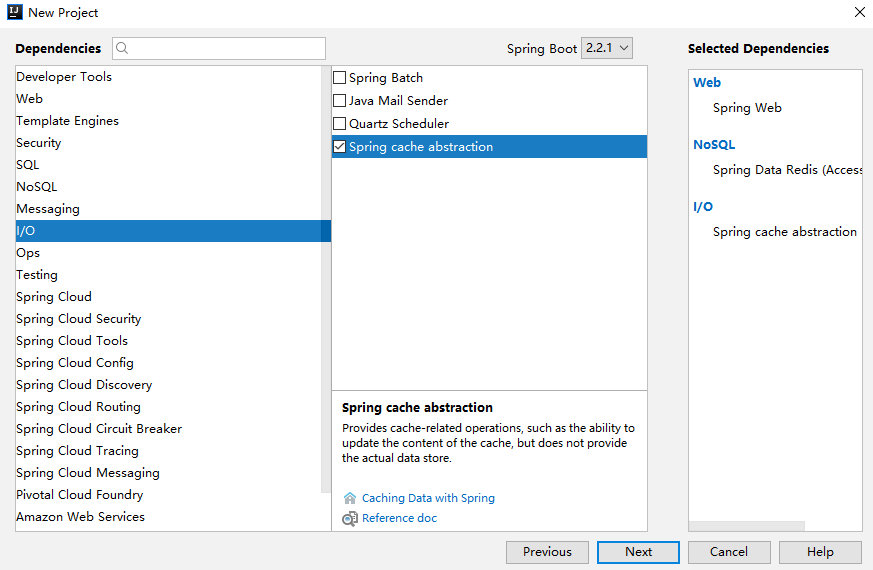
首先创建一个 Spring Boot 工程,注意创建的时候需要引入三个依赖, web、cache 以及 redis,如下图:
对应的依赖内容如下:
<dependency>
    <groupId>org.springframework.boot</groupId>
    <artifactId>spring-boot-starter-cache</artifactId>
</dependency>
<dependency>
    <groupId>org.springframework.boot</groupId>
    <artifactId>spring-boot-starter-data-redis</artifactId>
</dependency>
<dependency>
    <groupId>org.springframework.boot</groupId>
    <artifactId>spring-boot-starter-web</artifactId>
</dependency>
# 基本配置
工程创建好之后,首先需要简单配置一下 Redis,Redis 的基本信息,另外,这里要用到 Cache,因此还需要稍微配置一下 Cache,如下:
spring.redis.port=6380
spring.redis.host=192.168.66.128

spring.cache.cache-names=c1
简单起见,这里我只是配置了 Redis 的端口和地址,然后给缓存取了一个名字,这个名字在后文会用到。
另外,还需要在配置类上添加如下代码,表示开启缓存:
@SpringBootApplication
@EnableCaching
public class RediscacheApplication {
    public static void main(String[] args) {
        SpringApplication.run(RediscacheApplication.class, args);
    }
}
完成了这些配置之后,Spring Boot 就会自动帮我们在后台配置一个 RedisCacheManager,相关的配置是在org.springframework.boot.autoconfigure.cache.RedisCacheConfiguration 类中完成的。部分源码如下:
@Configuration
@ConditionalOnClass(RedisConnectionFactory.class)
@AutoConfigureAfter(RedisAutoConfiguration.class)
@ConditionalOnBean(RedisConnectionFactory.class)
@ConditionalOnMissingBean(CacheManager.class)
@Conditional(CacheCondition.class)
class RedisCacheConfiguration {
	@Bean
	public RedisCacheManager cacheManager(RedisConnectionFactory redisConnectionFactory,
			ResourceLoader resourceLoader) {
		RedisCacheManagerBuilder builder = RedisCacheManager
				.builder(redisConnectionFactory)
				.cacheDefaults(determineConfiguration(resourceLoader.getClassLoader()));
		List<String> cacheNames = this.cacheProperties.getCacheNames();
		if (!cacheNames.isEmpty()) {
			builder.initialCacheNames(new LinkedHashSet<>(cacheNames));
		}
		return this.customizerInvoker.customize(builder.build());
	}
}
看类上的注解,发现在万事俱备的情况下,系统会自动提供一个 RedisCacheManager 的 Bean,这个 RedisCacheManager 间接实现了 Spring 中的 Cache 接口,有了这个 Bean,我们就可以直接使用 Spring 中的缓存注解和接口了,而缓存数据则会被自动存储到 Redis 上。在单机的 Redis 中,这个 Bean 系统会自动提供,如果是 Redis 集群,这个 Bean 需要开发者来提供(后面的文章会讲到)。
# 缓存使用
这里主要向小伙伴们介绍缓存中几个核心的注解使用。
# @CacheConfig
这个注解在类上使用,用来描述该类中所有方法使用的缓存名称,当然也可以不使用该注解,直接在具体的缓存注解上配置名称,示例代码如下:
@Service
@CacheConfig(cacheNames = "c1")
public class UserService {
}
# @Cacheable
这个注解一般加在查询方法上,表示将一个方法的返回值缓存起来,默认情况下,缓存的 key 就是方法的参数,缓存的 value 就是方法的返回值。示例代码如下:
@Cacheable(key = "#id")
public User getUserById(Integer id,String username) {
    System.out.println("getUserById");
    return getUserFromDBById(id);
}
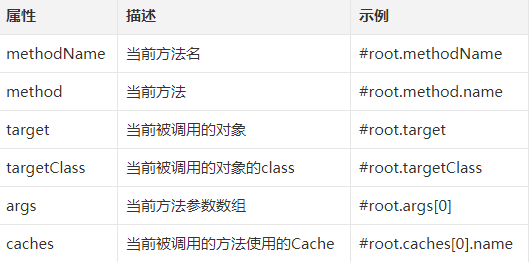
当有多个参数时,默认就使用多个参数来做 key,如果只需要其中某一个参数做 key,则可以在 @Cacheable 注解中,通过 key 属性来指定 key,如上代码就表示只使用 id 作为缓存的 key,如果对 key 有复杂的要求,可以自定义 keyGenerator。当然,Spring Cache 中提供了 root 对象,可以在不定义 keyGenerator 的情况下实现一些复杂的效果:
# @CachePut
这个注解一般加在更新方法上,当数据库中的数据更新后,缓存中的数据也要跟着更新,使用该注解,可以将方法的返回值自动更新到已经存在的 key 上,示例代码如下:
@CachePut(key = "#user.id")
public User updateUserById(User user) {
    return user;
}
# @CacheEvict
这个注解一般加在删除方法上,当数据库中的数据删除后,相关的缓存数据也要自动清除,该注解在使用的时候也可以配置按照某种条件删除(condition 属性)或者或者配置清除所有缓存(allEntries 属性),示例代码如下:
@CacheEvict()
public void deleteUserById(Integer id) {
    //在这里执行删除操作, 删除是去数据库中删除
}
# 总结
在 Spring Boot 中,使用 Redis 缓存,既可以使用 RedisTemplate 自己来实现,也可以使用使用这种方式,这种方式是 Spring Cache 提供的统一接口,实现既可以是 Redis,也可以是 Ehcache 或者其他支持这种规范的缓存框架。从这个角度来说,Spring Cache 和 Redis、Ehcache 的关系就像 JDBC 与各种数据库驱动的关系。
好了,关于这个问题就说到这里,有问题欢迎留言讨论。本文相关案例我已经上传到 GitHub ,大家可以自行下载:https://github.com/lenve/javaboy-code-samples