框架源码是我们 Coding 晋级中的必修课,SSM 应该算是小伙伴们日常接触最多的框架了,这其中 SpringMVC 初始化流程相对来说要简单一些,因此今天松哥就先来和大家分析一下 SpringMVC 初始化流程。
即使你没看过 SpringMVC 的源码,估计也听说过:DispatcherServlet 是 SpringMVC 的大脑,它负责整个 SpringMVC 的调度工作,是 SpringMVC 中最最核心的类,SpringMVC 整个顶层架构设计都体现在这里,所以搞明白 DispatcherServlet 的源码,基本上 SpringMVC 的工作原理也就了然于胸了。
然而 DispatcherServlet 继承自 FrameworkServlet,FrameworkServlet 又继承自 HttpServletBean,如下图:
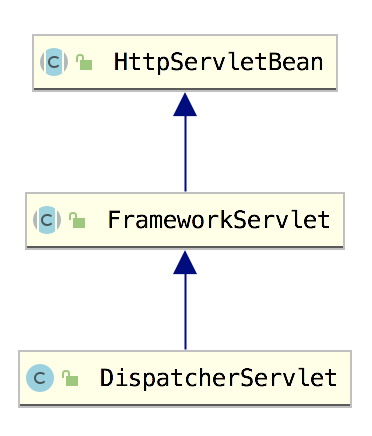
因此我们的分析就从 HttpServletBean 开始。
# 1.HttpServletBean
HttpServletBean 继承自 HttpServlet,它负责将 init-param 中的参数注入到当前 Servlet 实例的属性中,同时也为子类提供了增加 requiredProperties 的能力,需要注意的是 HttpServletBean 并不依赖于 Spring 容器。
大家知道,HttpServlet 的初始化是从 init 方法开始的,所以我们就先从 HttpServletBean 的 init 方法开始看起:
@Override
public final void init() throws ServletException {
	// Set bean properties from init parameters.
	PropertyValues pvs = new ServletConfigPropertyValues(getServletConfig(), this.requiredProperties);
	if (!pvs.isEmpty()) {
		try {
			BeanWrapper bw = PropertyAccessorFactory.forBeanPropertyAccess(this);
			ResourceLoader resourceLoader = new ServletContextResourceLoader(getServletContext());
			bw.registerCustomEditor(Resource.class, new ResourceEditor(resourceLoader, getEnvironment()));
			initBeanWrapper(bw);
			bw.setPropertyValues(pvs, true);
		}
		catch (BeansException ex) {
			if (logger.isErrorEnabled()) {
				logger.error("Failed to set bean properties on servlet '" + getServletName() + "'", ex);
			}
			throw ex;
		}
	}
	// Let subclasses do whatever initialization they like.
	initServletBean();
}
在这个方法里,首先获取到 Servlet 的所有配置并转为 PropertyValues,然后通过 BeanWrapper 修改目标 Servlet 的相关属性。BeanWrapper 是 Spring 中提供一个工具,使用它可以修改一个对象的属性,像下面这样:
public class Main {
    public static void main(String[] args) {
        User user = new User();
        BeanWrapper beanWrapper = PropertyAccessorFactory.forBeanPropertyAccess(user);
        beanWrapper.setPropertyValue("username", "itboyhub");
        PropertyValue pv = new PropertyValue("address", "www.itboyhub.com");
        beanWrapper.setPropertyValue(pv);
        System.out.println("user = " + user);
    }
}
最终输出:
user = User{username='itboyhub', address='www.itboyhub.com'}
所以前面的 bw 实际上就代表当前 DispatcherServlet 对象。
通过 BeanWrapper 修改目标 Servlet 的相关属性时,有一个 initBeanWrapper 方法是空方法,开发者如有需要可以在子类中实现该方法,并且完成一些初始化操作。
属性配置完成后,最终调用 initServletBean 方法进行 Servlet 初始化,然而该方法也是一个空方法,在子类中实现。
这就是 HttpServletBean 所做的事情,比较简单,加载 Servlet 相关属性并设置给当前 Servlet 对象,然后调用 initServletBean 方法继续完成 Servlet 的初始化操作。
# 2.FrameworkServlet
从前面的介绍可知,FrameworkServlet 初始化的入口方法就是 initServletBean,因此我们就从 FrameworkServlet#initServletBean 方法开始看起:
@Override
protected final void initServletBean() throws ServletException {
	//省略...
	try {
		this.webApplicationContext = initWebApplicationContext();
		initFrameworkServlet();
	}
	catch (ServletException | RuntimeException ex) {
		//省略...
	}
}
这个方法原本挺长的,但是抛开日志打印异常抛出,剩下的核心代码其实就两行:
- initWebApplicationContext 方法用来初始化 WebApplicationContext。
- initFrameworkServlet 方法用来初始化 FrameworkServlet,但是这个方法是一个空方法,没有具体的实现。本来子类可以重写该方法做一些初始化操作,但是实际上子类并没有重写该方法,所以这个方法我们就暂且忽略之,不去分析了。
那么这里最为重要的其实就是 initWebApplicationContext 方法了,我们一起来看下:
protected WebApplicationContext initWebApplicationContext() {
	WebApplicationContext rootContext =
			WebApplicationContextUtils.getWebApplicationContext(getServletContext());
	WebApplicationContext wac = null;
	if (this.webApplicationContext != null) {
		wac = this.webApplicationContext;
		if (wac instanceof ConfigurableWebApplicationContext) {
			ConfigurableWebApplicationContext cwac = (ConfigurableWebApplicationContext) wac;
			if (!cwac.isActive()) {
				if (cwac.getParent() == null) {
					cwac.setParent(rootContext);
				}
				configureAndRefreshWebApplicationContext(cwac);
			}
		}
	}
	if (wac == null) {
		wac = findWebApplicationContext();
	}
	if (wac == null) {
		wac = createWebApplicationContext(rootContext);
	}
	if (!this.refreshEventReceived) {
		synchronized (this.onRefreshMonitor) {
			onRefresh(wac);
		}
	}
	if (this.publishContext) {
		String attrName = getServletContextAttributeName();
		getServletContext().setAttribute(attrName, wac);
	}
	return wac;
}
这里的逻辑也比较清晰:
- 首先获取 rootContext。在默认情况下,Spring 会将容器设置为 ServletContext 的一个属性,属性的 key 为
org.springframework.web.context.WebApplicationContext.ROOT,所以根据这个 key 就可以调用 ServletContext#getAttribute 方法获取到 rootContext 了。 - 获取 WebApplicationContext 实例,也就是给 wac 变量赋值的过程,这里存在三种可能性:1.如果已经通过构造方法给 webApplicationContext 赋值了,则直接将其赋给 wac 变量,同时,如果需要设置 parent 就设置,需要刷新就刷新。这种方式适用于 Servlet3.0 以后的环境,因为从 Servlet3.0 开始,才支持直接调用 ServletContext.addServlet 方法去注册 Servlet,手动注册的时候就可以使用自己提前准备好的 WebApplicationContext 了,这块松哥在我录制的 Spring Boot 视频中也讲过,感兴趣的小伙伴可以在公众号后台回复 vhr 查看视频详情;2.如果第一步没能成功给 wac 赋值,那么调用 findWebApplicationContext 方法尝试去 ServletContext 中查找 WebApplicationContext 对象,找到了就赋值给 wac;3.如果第二步没能成功给 wac 赋值,那么调用 createWebApplicationContext 方法创建一个 WebApplicationContext 对象并赋值给 wac,一般来说都是通过这种方式创建的 WebApplicationContext。这三套组合拳下来,wac 肯定是有值了。
- 当 ContextRefreshedEvent 事件没有触发时,调用 onRefresh 方法完成容器刷新(由于第一种和第三种获取 WebApplicationContext 的方式最终都会调用 configureAndRefreshWebApplicationContext 方法,然后发布事件,再将 refreshEventReceived 变量标记为 true,所以实际上只有第二种方式获取 wac 实例的时候,这里才会刷新,具体可以看下文分析)。
- 最后将 wac 保存到到 ServletContext 中。保存的时候会根据 publishContext 变量的值来决定是否保存,publishContext 可以在 web.xml 中配置 Servlet 时通过 init-param 进行配置,保存的目的是为了方便获取。
上面的这些步骤中,通过 createWebApplicationContext 方法创建 WebApplicationContext 对象需要和大家细说下,因为一般情况下就是通过这种方式创建的 WebApplicationContext。我们来看一下相关的方法:
protected WebApplicationContext createWebApplicationContext(@Nullable ApplicationContext parent) {
	Class<?> contextClass = getContextClass();
	if (!ConfigurableWebApplicationContext.class.isAssignableFrom(contextClass)) {
		throw new ApplicationContextException(
				"Fatal initialization error in servlet with name '" + getServletName() +
				"': custom WebApplicationContext class [" + contextClass.getName() +
				"] is not of type ConfigurableWebApplicationContext");
	}
	ConfigurableWebApplicationContext wac =
			(ConfigurableWebApplicationContext) BeanUtils.instantiateClass(contextClass);
	wac.setEnvironment(getEnvironment());
	wac.setParent(parent);
	String configLocation = getContextConfigLocation();
	if (configLocation != null) {
		wac.setConfigLocation(configLocation);
	}
	configureAndRefreshWebApplicationContext(wac);
	return wac;
}
protected void configureAndRefreshWebApplicationContext(ConfigurableWebApplicationContext wac) {
	if (ObjectUtils.identityToString(wac).equals(wac.getId())) {
		// The application context id is still set to its original default value
		// -> assign a more useful id based on available information
		if (this.contextId != null) {
			wac.setId(this.contextId);
		}
		else {
			// Generate default id...
			wac.setId(ConfigurableWebApplicationContext.APPLICATION_CONTEXT_ID_PREFIX +
					ObjectUtils.getDisplayString(getServletContext().getContextPath()) + '/' + getServletName());
		}
	}
	wac.setServletContext(getServletContext());
	wac.setServletConfig(getServletConfig());
	wac.setNamespace(getNamespace());
	wac.addApplicationListener(new SourceFilteringListener(wac, new ContextRefreshListener()));
	// The wac environment's #initPropertySources will be called in any case when the context
	// is refreshed; do it eagerly here to ensure servlet property sources are in place for
	// use in any post-processing or initialization that occurs below prior to #refresh
	ConfigurableEnvironment env = wac.getEnvironment();
	if (env instanceof ConfigurableWebEnvironment) {
		((ConfigurableWebEnvironment) env).initPropertySources(getServletContext(), getServletConfig());
	}
	postProcessWebApplicationContext(wac);
	applyInitializers(wac);
	wac.refresh();
}
这里一共涉及到两个方法:
createWebApplicationContext
首先获取到创建类型,并检查创建类型,没问题的话调用 instantiateClass 方法完成创建工作,然后给创建好的 wac 对象配置各种属性,配置的 configLocation 就是我们在 web.xml 文件中配置的 SpringMVC 配置文件路径,默认的文件路径是 /WEB-INF/[servletName]-servlet.xml。
configureAndRefreshWebApplicationContext
configureAndRefreshWebApplicationContext 方法主要也是配置&刷新 WebApplicationContext,在这个方法里会调用 addApplicationListener 为 wac 添加一个监听器,监听的是 ContextRefreshedEvent 事件,当收到该事件后,会调用 FrameworkServlet 的 onApplicationEvent 方法,并在该方法中调用 onRefresh 方法完成刷新,刷新之后,会将 refreshEventReceived 变量标记为 true。
public void onApplicationEvent(ContextRefreshedEvent event) {
	this.refreshEventReceived = true;
	synchronized (this.onRefreshMonitor) {
		onRefresh(event.getApplicationContext());
	}
}
这就是 FrameworkServlet#initServletBean 方法的大致工作逻辑。这里涉及到了 onRefresh 方法,但是这是一个空方法,在子类 DispatcherServlet 中实现了,所以接下来我们就来看 DispatcherServlet。
# 3.DispatcherServlet
这里我们就不废话了,直接来看 onRefresh 方法,如下:
@Override
protected void onRefresh(ApplicationContext context) {
	initStrategies(context);
}
protected void initStrategies(ApplicationContext context) {
	initMultipartResolver(context);
	initLocaleResolver(context);
	initThemeResolver(context);
	initHandlerMappings(context);
	initHandlerAdapters(context);
	initHandlerExceptionResolvers(context);
	initRequestToViewNameTranslator(context);
	initViewResolvers(context);
	initFlashMapManager(context);
}
在 onRefresh 方法中调用了 initStrategies 进行初始化操作。initStrategies 的内容其实很简单,就是九个组件的初始化。九个的初始化流程比较类似,这里我们以常见的视图解析器的初始化方法 initViewResolvers 为例,来一起看看初始化流程:
private void initViewResolvers(ApplicationContext context) {
	this.viewResolvers = null;
	if (this.detectAllViewResolvers) {
		// Find all ViewResolvers in the ApplicationContext, including ancestor contexts.
		Map<String, ViewResolver> matchingBeans =
				BeanFactoryUtils.beansOfTypeIncludingAncestors(context, ViewResolver.class, true, false);
		if (!matchingBeans.isEmpty()) {
			this.viewResolvers = new ArrayList<>(matchingBeans.values());
			// We keep ViewResolvers in sorted order.
			AnnotationAwareOrderComparator.sort(this.viewResolvers);
		}
	}
	else {
		try {
			ViewResolver vr = context.getBean(VIEW_RESOLVER_BEAN_NAME, ViewResolver.class);
			this.viewResolvers = Collections.singletonList(vr);
		}
		catch (NoSuchBeanDefinitionException ex) {
			// Ignore, we'll add a default ViewResolver later.
		}
	}
	// Ensure we have at least one ViewResolver, by registering
	// a default ViewResolver if no other resolvers are found.
	if (this.viewResolvers == null) {
		this.viewResolvers = getDefaultStrategies(context, ViewResolver.class);
		if (logger.isTraceEnabled()) {
			logger.trace("No ViewResolvers declared for servlet '" + getServletName() +
					"': using default strategies from DispatcherServlet.properties");
		}
	}
}
一开始的 viewResolvers 变量是一个集合,解析出来的视图解析器对象都将放入这个集合中。
首先判断 detectAllViewResolvers 变量是否为 true,如果为 true,则直接去查找 Spring 容器中的所有视图解析器,将查找结果赋值给 viewResolvers,然后进行排序。默认情况下 detectAllViewResolvers 变量的值为 true,如果有需要,可以在 web.xml 中进行配置,像下面这样:
<servlet>
    <servlet-name>springmvc</servlet-name>
    <servlet-class>org.springframework.web.servlet.DispatcherServlet</servlet-class>
    <init-param>
        <param-name>contextConfigLocation</param-name>
        <param-value>classpath:spring-servlet.xml</param-value>
    </init-param>
    <init-param>
        <param-name>detectAllViewResolvers</param-name>
        <param-value>false</param-value>
    </init-param>
    <load-on-startup>1</load-on-startup>
</servlet>
<servlet-mapping>
    <servlet-name>springmvc</servlet-name>
    <url-pattern>/</url-pattern>
</servlet-mapping>
如果 detectAllViewResolvers 的值为 false,那么接下来就会去 Spring 容器中查找一个名为 viewResolver 的视图解析器,此时查找到的就是一个单独的视图解析器。
一般来说,我们并不需要在 web.xml 中去配置 detectAllViewResolvers 的值,视图解析器有多少个就加载多少个。
举个简单例子,我们在 SpringMVC 的配置文件中可能像下面这样配置视图解析器:
<bean class="org.springframework.web.servlet.view.InternalResourceViewResolver" id="viewResolver">
    <property name="prefix" value="/WEB-INF/jsp/"/>
    <property name="suffix" value=".jsp"/>
</bean>
默认情况下,这个 bean 的 id 有没有都行,如果有,取什么值都可以,反正最终都是通过类型而不是 id 去查找的视图解析器。但是如果你在 web.xml 中将 detectAllViewResolvers 修改为 false,那么这个 bean 的 id 取值就比较重要了,就一定要是 viewResolver。
如果在 Spring 容器中通过这两种方式(通过类型查找或通过 id 查找)都没有找到 ViewResolver 实例,那么会调用 getDefaultStrategies 方法去获取一个默认的 ViewResolver 实例。默认实例的获取方式如下:
protected <T> List<T> getDefaultStrategies(ApplicationContext context, Class<T> strategyInterface) {
	if (defaultStrategies == null) {
		try {
			// Load default strategy implementations from properties file.
			// This is currently strictly internal and not meant to be customized
			// by application developers.
			ClassPathResource resource = new ClassPathResource(DEFAULT_STRATEGIES_PATH, DispatcherServlet.class);
			defaultStrategies = PropertiesLoaderUtils.loadProperties(resource);
		}
		catch (IOException ex) {
			throw new IllegalStateException("Could not load '" + DEFAULT_STRATEGIES_PATH + "': " + ex.getMessage());
		}
	}
	String key = strategyInterface.getName();
	String value = defaultStrategies.getProperty(key);
	if (value != null) {
		String[] classNames = StringUtils.commaDelimitedListToStringArray(value);
		List<T> strategies = new ArrayList<>(classNames.length);
		for (String className : classNames) {
			try {
				Class<?> clazz = ClassUtils.forName(className, DispatcherServlet.class.getClassLoader());
				Object strategy = createDefaultStrategy(context, clazz);
				strategies.add((T) strategy);
			}
			catch (ClassNotFoundException ex) {
				throw new BeanInitializationException(
						"Could not find DispatcherServlet's default strategy class [" + className +
						"] for interface [" + key + "]", ex);
			}
			catch (LinkageError err) {
				throw new BeanInitializationException(
						"Unresolvable class definition for DispatcherServlet's default strategy class [" +
						className + "] for interface [" + key + "]", err);
			}
		}
		return strategies;
	}
	else {
		return Collections.emptyList();
	}
}
这段代码其实也比较简单,就是通过反射去获取默认的视图解析器。
首先给 defaultStrategies 赋值,defaultStrategies 的值实际上就是从 DispatcherServlet.properties 文件中加载到的,我们来看下这个文件内容:
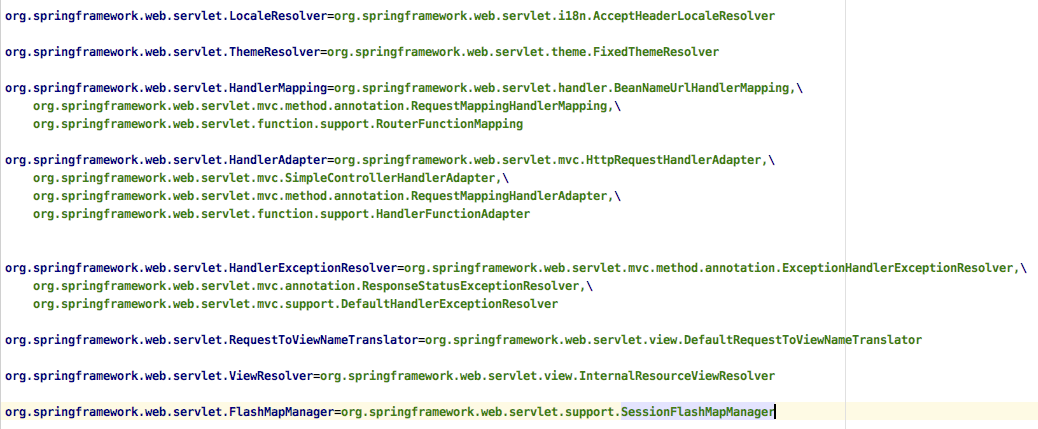
可以看到,这里一共定义了 8 个默认的键值对,有的值是一个,有的值是多个。前面 initStrategies 方法中一共要初始化九个组件,这里默认只定义了 8 个,少了一个 MultipartResolver,这也好理解,并非所有的项目都有文件上传,而且即使有文件上传,用哪一个具体的 MultipartResolver 也不好确定,还是要开发者自己决定。
defaultStrategies 其实加载到的就是这 8 个键值对,其中视图解析器对应的是 org.springframework.web.servlet.view.InternalResourceViewResolver,通过反射创建该类的实例,当 Spring 容器中不存在任何视图解析器的时候,默认的视图解析器即此。
这就是 initViewResolvers 的工作流程,另外 8 个也和它差不多,唯一不同的是 initMultipartResolver,如下:
private void initMultipartResolver(ApplicationContext context) {
	try {
		this.multipartResolver = context.getBean(MULTIPART_RESOLVER_BEAN_NAME, MultipartResolver.class);
	}
	catch (NoSuchBeanDefinitionException ex) {
		this.multipartResolver = null;
	}
}
可以看到,它只是根据 bean 的名字去查找 bean 实例,没有去查找默认的 MultipartResolver。
说到这里,松哥和大家多说一句 SpringMVC 配置中的小细节,
<bean class="org.springframework.web.servlet.view.InternalResourceViewResolver" id="viewResolver">
    <property name="prefix" value="/WEB-INF/jsp/"/>
    <property name="suffix" value=".jsp"/>
</bean>
<bean class="org.springframework.web.multipart.commons.CommonsMultipartResolver" id="multipartResolver">
</bean>
上面这个关于视图解析器和文件上传解析器的配置,不知道小伙伴们有没有注意过,视图解析器的 id 可有可无,而文件上传解析器的 id 必须是 multipartResolver,回顾我们上面的源码分析,你就知道为啥了!
# 4.小结
好啦,这就是松哥和小伙伴们分享的 SpringMVC 的初始化流程,主要涉及到了 HttpServletBean、FrameworkServlet 以及 DispatcherServlet 三个实例,HttpServletBean 主要是加载 Servlet 配置的各种属性并设置到 Servlet 上;FrameworkServlet 则主要是初始化了 WebApplicationContext;DispatcherServlet 则主要是初始化了自身的九个组件。
这只是初始化的流程,那么当请求到来之后,请求的流程又是怎么样的呢?这个松哥下篇文章来和大家分享~好啦,今天就先和小伙伴们聊这么多。