有小伙伴会说,自定义认证逻辑还不简单?是的,没错,松哥之前也多次教过大家如何自定义认证逻辑,无论是添加登录验证码还是修改登录数据库格式,都需要对认证逻辑作出调整。
之前我们自定义的一个核心思路就是自定义过滤器,在过滤器中做各种各样我们想做的事:
上面这两篇文章都是使用了自定义过滤器的思路,这算是一种入门级的自定义认证逻辑了,不知道大家有没有想过,这种方式其实是有一些问题的。
举一个简单的例子,在添加登录验证码中,我为了校验验证码就自定义了一个过滤器,并把这个自定义的过滤器放入 SpringSecurity 过滤器链中,每次请求都会通过该过滤器。但实际上,只需要登录请求经过该过滤器即可,其他请求是不需要经过该过滤器的,这个时候,大家是不是就发现弊端了。
当然,如果你对性能没有极致追求,这种写法其实也问题不大,毕竟功能已经实现了,但是抱着学习的态度,今天松哥要在前面文章的基础上给大家介绍一个更加优雅的写法。
本文是我们 SpringSecurity 系列的第 11 篇,阅读本系列前面文章有助于更好的理解本文:
- 挖一个大坑,Spring Security 开搞!
- 松哥手把手带你入门 Spring Security,别再问密码怎么解密了
- 手把手教你定制 Spring Security 中的表单登录
- Spring Security 做前后端分离,咱就别做页面跳转了!统统 JSON 交互
- Spring Security 中的授权操作原来这么简单
- Spring Security 如何将用户数据存入数据库?
- Spring Security+Spring Data Jpa 强强联手,安全管理只有更简单!
- Spring Boot + Spring Security 实现自动登录功能
- Spring Boot 自动登录,安全风险要怎么控制?
- 在微服务项目中,Spring Security 比 Shiro 强在哪?
好了,不废话了,我们开始今天的文章。
# 1.认证流程简析
AuthenticationProvider 定义了 Spring Security 中的验证逻辑,我们来看下 AuthenticationProvider 的定义:
public interface AuthenticationProvider {
	Authentication authenticate(Authentication authentication)
			throws AuthenticationException;
	boolean supports(Class<?> authentication);
}
可以看到,AuthenticationProvider 中就两个方法:
- authenticate 方法用来做验证,就是验证用户身份。
- supports 则用来判断当前的 AuthenticationProvider 是否支持对应的 Authentication。
这里又涉及到一个东西,就是 Authentication。
玩过 Spring Security 的小伙伴都知道,在 Spring Security 中有一个非常重要的对象叫做 Authentication,我们可以在任何地方注入 Authentication 进而获取到当前登录用户信息,Authentication 本身是一个接口,它实际上对 java.security.Principal 做的进一步封装,我们来看下 Authentication 的定义:
public interface Authentication extends Principal, Serializable {
	Collection<? extends GrantedAuthority> getAuthorities();
	Object getCredentials();
	Object getDetails();
	Object getPrincipal();
	boolean isAuthenticated();
	void setAuthenticated(boolean isAuthenticated) throws IllegalArgumentException;
}
可以看到,这里接口中的方法也没几个,我来大概解释下:
- getAuthorities 方法用来获取用户的权限。
- getCredentials 方法用来获取用户凭证,一般来说就是密码。
- getDetails 方法用来获取用户携带的详细信息,可能是当前请求之类的东西。
- getPrincipal 方法用来获取当前用户,可能是一个用户名,也可能是一个用户对象。
- isAuthenticated 当前用户是否认证成功。
Authentication 作为一个接口,它定义了用户,或者说 Principal 的一些基本行为,它有很多实现类:

在这些实现类中,我们最常用的就是 UsernamePasswordAuthenticationToken 了,而每一个 Authentication 都有适合它的 AuthenticationProvider 去处理校验。例如处理 UsernamePasswordAuthenticationToken 的 AuthenticationProvider 是 DaoAuthenticationProvider。
所以大家在 AuthenticationProvider 中看到一个 supports 方法,就是用来判断 AuthenticationProvider 是否支持当前 Authentication。
在一次完整的认证中,可能包含多个 AuthenticationProvider,而这多个 AuthenticationProvider 则由 ProviderManager 进行统一管理,具体可以参考松哥之前的文章:松哥手把手带你捋一遍 Spring Security 登录流程。
这里我们来重点看一下 DaoAuthenticationProvider,因为这是我们最常用的一个,当我们使用用户名/密码登录的时候,用的就是它,DaoAuthenticationProvider 的父类是 AbstractUserDetailsAuthenticationProvider,我们就先从它的父类看起:
public abstract class AbstractUserDetailsAuthenticationProvider implements
		AuthenticationProvider, InitializingBean, MessageSourceAware {
	public Authentication authenticate(Authentication authentication)
			throws AuthenticationException {
		String username = (authentication.getPrincipal() == null) ? "NONE_PROVIDED"
				: authentication.getName();
		boolean cacheWasUsed = true;
		UserDetails user = this.userCache.getUserFromCache(username);
		if (user == null) {
			cacheWasUsed = false;
			try {
				user = retrieveUser(username,
						(UsernamePasswordAuthenticationToken) authentication);
			}
			catch (UsernameNotFoundException notFound) {
				logger.debug("User '" + username + "' not found");

				if (hideUserNotFoundExceptions) {
					throw new BadCredentialsException(messages.getMessage(
							"AbstractUserDetailsAuthenticationProvider.badCredentials",
							"Bad credentials"));
				}
				else {
					throw notFound;
				}
			}
		}

		try {
			preAuthenticationChecks.check(user);
			additionalAuthenticationChecks(user,
					(UsernamePasswordAuthenticationToken) authentication);
		}
		catch (AuthenticationException exception) {
			if (cacheWasUsed) {
				cacheWasUsed = false;
				user = retrieveUser(username,
						(UsernamePasswordAuthenticationToken) authentication);
				preAuthenticationChecks.check(user);
				additionalAuthenticationChecks(user,
						(UsernamePasswordAuthenticationToken) authentication);
			}
			else {
				throw exception;
			}
		}

		postAuthenticationChecks.check(user);

		if (!cacheWasUsed) {
			this.userCache.putUserInCache(user);
		}

		Object principalToReturn = user;

		if (forcePrincipalAsString) {
			principalToReturn = user.getUsername();
		}

		return createSuccessAuthentication(principalToReturn, authentication, user);
	}
	public boolean supports(Class<?> authentication) {
		return (UsernamePasswordAuthenticationToken.class
				.isAssignableFrom(authentication));
	}
}
AbstractUserDetailsAuthenticationProvider 的代码还是挺长的,这里我们重点关注两个方法:authenticate 和 supports。
authenticate 方法就是用来做认证的方法,我们来简单看下方法流程:
- 首先从 Authentication 提取出登录用户名。
- 然后通过拿着 username 去调用 retrieveUser 方法去获取当前用户对象,这一步会调用我们自己在登录时候的写的 loadUserByUsername 方法,所以这里返回的 user 其实就是你的登录对象,可以参考微人事的 org/javaboy/vhr/service/HrService.java#L34,也可以参考本系列之前的文章:Spring Security+Spring Data Jpa 强强联手,安全管理只有更简单!。
- 接下来调用 preAuthenticationChecks.check 方法去检验 user 中的各个账户状态属性是否正常,例如账户是否被禁用、账户是否被锁定、账户是否过期等等。
- additionalAuthenticationChecks 方法则是做密码比对的,好多小伙伴好奇 Spring Security 的密码加密之后,是如何进行比较的,看这里就懂了,因为比较的逻辑很简单,我这里就不贴代码出来了。但是注意,additionalAuthenticationChecks 方法是一个抽象方法,具体的实现是在 AbstractUserDetailsAuthenticationProvider 的子类中实现的,也就是 DaoAuthenticationProvider。这个其实很好理解,因为 AbstractUserDetailsAuthenticationProvider 作为一个较通用的父类,处理一些通用的行为,我们在登录的时候,有的登录方式并不需要密码,所以 additionalAuthenticationChecks 方法一般交给它的子类去实现,在 DaoAuthenticationProvider 类中,additionalAuthenticationChecks 方法就是做密码比对的,在其他的 AuthenticationProvider 中,additionalAuthenticationChecks 方法的作用就不一定了。
- 最后在 postAuthenticationChecks.check 方法中检查密码是否过期。
- 接下来有一个 forcePrincipalAsString 属性,这个是是否强制将 Authentication 中的 principal 属性设置为字符串,这个属性我们一开始在 UsernamePasswordAuthenticationFilter 类中其实就是设置为字符串的(即 username),但是默认情况下,当用户登录成功之后, 这个属性的值就变成当前用户这个对象了。之所以会这样,就是因为 forcePrincipalAsString 默认为 false,不过这块其实不用改,就用 false,这样在后期获取当前用户信息的时候反而方便很多。
- 最后,通过 createSuccessAuthentication 方法构建一个新的 UsernamePasswordAuthenticationToken。
supports 方法就比较简单了,主要用来判断当前的 Authentication 是否是 UsernamePasswordAuthenticationToken。
由于 AbstractUserDetailsAuthenticationProvider 已经把 authenticate 和 supports 方法实现了,所以在 DaoAuthenticationProvider 中,我们主要关注 additionalAuthenticationChecks 方法即可:
public class DaoAuthenticationProvider extends AbstractUserDetailsAuthenticationProvider {
	@SuppressWarnings("deprecation")
	protected void additionalAuthenticationChecks(UserDetails userDetails,
			UsernamePasswordAuthenticationToken authentication)
			throws AuthenticationException {
		if (authentication.getCredentials() == null) {
			throw new BadCredentialsException(messages.getMessage(
					"AbstractUserDetailsAuthenticationProvider.badCredentials",
					"Bad credentials"));
		}
		String presentedPassword = authentication.getCredentials().toString();
		if (!passwordEncoder.matches(presentedPassword, userDetails.getPassword())) {
			throw new BadCredentialsException(messages.getMessage(
					"AbstractUserDetailsAuthenticationProvider.badCredentials",
					"Bad credentials"));
		}
	}
}
大家可以看到,additionalAuthenticationChecks 方法主要用来做密码比对的,逻辑也比较简单,就是调用 PasswordEncoder 的 matches 方法做比对,如果密码不对则直接抛出异常即可。
正常情况下,我们使用用户名/密码登录,最终都会走到这一步。
而 AuthenticationProvider 都是通过 ProviderManager#authenticate 方法来调用的。由于我们的一次认证可能会存在多个 AuthenticationProvider,所以,在 ProviderManager#authenticate 方法中会逐个遍历 AuthenticationProvider,并调用他们的 authenticate 方法做认证,我们来稍微瞅一眼 ProviderManager#authenticate 方法:
public Authentication authenticate(Authentication authentication)
		throws AuthenticationException {
	for (AuthenticationProvider provider : getProviders()) {
		result = provider.authenticate(authentication);
		if (result != null) {
			copyDetails(authentication, result);
			break;
		}
	}
    ...
    ...
}
可以看到,在这个方法中,会遍历所有的 AuthenticationProvider,并调用它的 authenticate 方法进行认证。
好了,大致的认证流程说完之后,相信大家已经明白了我们要从哪里下手了。
# 2.自定义认证思路
之前我们通过自定义过滤器,将自定义的过滤器加入到 Spring Security 过滤器链中,进而实现了添加登录验证码功能,但是我们也说这种方式是有弊端的,就是破坏了原有的过滤器链,请求每次都要走一遍验证码过滤器,这样不合理。
我们改进的思路也很简单。
登录请求是调用 AbstractUserDetailsAuthenticationProvider#authenticate 方法进行认证的,在该方法中,又会调用到 DaoAuthenticationProvider#additionalAuthenticationChecks 方法做进一步的校验,去校验用户登录密码。我们可以自定义一个 AuthenticationProvider 代替 DaoAuthenticationProvider,并重写它里边的 additionalAuthenticationChecks 方法,在重写的过程中,加入验证码的校验逻辑即可。
这样既不破坏原有的过滤器链,又实现了自定义认证功能。常见的手机号码动态登录,也可以使用这种方式来认证。
好了,不 bb 了,咱们上代码。
# 3.代码实现
首先我们需要验证码,这次我就懒得自己去实现了,我们用网上一个现成的验证码库 kaptcha,首先我们添加该库的依赖,如下:
<dependency>
    <groupId>com.github.penggle</groupId>
    <artifactId>kaptcha</artifactId>
    <version>2.3.2</version>
</dependency>
然后我们提供一个实体类用来描述验证码的基本信息:
@Bean
Producer verifyCode() {
    Properties properties = new Properties();
    properties.setProperty("kaptcha.image.width", "150");
    properties.setProperty("kaptcha.image.height", "50");
    properties.setProperty("kaptcha.textproducer.char.string", "0123456789");
    properties.setProperty("kaptcha.textproducer.char.length", "4");
    Config config = new Config(properties);
    DefaultKaptcha defaultKaptcha = new DefaultKaptcha();
    defaultKaptcha.setConfig(config);
    return defaultKaptcha;
}
这段配置很简单,我们就是提供了验证码图片的宽高、字符库以及生成的验证码字符长度。
接下来提供一个返回验证码图片的接口:
@RestController
public class VerifyCodeController {
    @Autowired
    Producer producer;
    @GetMapping("/vc.jpg")
    public void getVerifyCode(HttpServletResponse resp, HttpSession session) throws IOException {
        resp.setContentType("image/jpeg");
        String text = producer.createText();
        session.setAttribute("verify_code", text);
        BufferedImage image = producer.createImage(text);
        try(ServletOutputStream out = resp.getOutputStream()) {
            ImageIO.write(image, "jpg", out);
        }
    }
}
这里我们生成验证码图片,并将生成的验证码字符存入 HttpSession 中。注意这里我用到了 try-with-resources ,可以自动关闭流,有的小伙伴可能不太清楚,可以自己搜索看下。
接下来我们来自定义一个 MyAuthenticationProvider 继承自 DaoAuthenticationProvider,并重写 additionalAuthenticationChecks 方法:
public class MyAuthenticationProvider extends DaoAuthenticationProvider {

    @Override
    protected void additionalAuthenticationChecks(UserDetails userDetails, UsernamePasswordAuthenticationToken authentication) throws AuthenticationException {
        HttpServletRequest req = ((ServletRequestAttributes) RequestContextHolder.getRequestAttributes()).getRequest();
        String code = req.getParameter("code");
        String verify_code = (String) req.getSession().getAttribute("verify_code");
        if (code == null || verify_code == null || !code.equals(verify_code)) {
            throw new AuthenticationServiceException("验证码错误");
        }
        super.additionalAuthenticationChecks(userDetails, authentication);
    }
}
在 additionalAuthenticationChecks 方法中:
- 首先获取当前请求,注意这种获取方式,在基于 Spring 的 web 项目中,我们可以随时随地获取到当前请求,获取方式就是我上面给出的代码。
- 从当前请求中拿到 code 参数,也就是用户传来的验证码。
- 从 session 中获取生成的验证码字符串。
- 两者进行比较,如果验证码输入错误,则直接抛出异常。
- 最后通过 super 调用父类方法,也就是 DaoAuthenticationProvider 的 additionalAuthenticationChecks 方法,该方法中主要做密码的校验。
MyAuthenticationProvider 定义好之后,接下来主要是如何让 MyAuthenticationProvider 代替 DaoAuthenticationProvider。
前面我们说,所有的 AuthenticationProvider 都是放在 ProviderManager 中统一管理的,所以接下来我们就要自己提供 ProviderManager,然后注入自定义的 MyAuthenticationProvider,这一切操作都在 SecurityConfig 中完成:
@Configuration
public class SecurityConfig extends WebSecurityConfigurerAdapter {
    @Bean
    PasswordEncoder passwordEncoder() {
        return NoOpPasswordEncoder.getInstance();
    }

    @Bean
    MyAuthenticationProvider myAuthenticationProvider() {
        MyAuthenticationProvider myAuthenticationProvider = new MyAuthenticationProvider();
        myAuthenticationProvider.setPasswordEncoder(passwordEncoder());
        myAuthenticationProvider.setUserDetailsService(userDetailsService());
        return myAuthenticationProvider;
    }

    @Override
    @Bean
    protected AuthenticationManager authenticationManager() throws Exception {
        ProviderManager manager = new ProviderManager(Arrays.asList(myAuthenticationProvider()));
        return manager;
    }

    @Bean
    @Override
    protected UserDetailsService userDetailsService() {
        InMemoryUserDetailsManager manager = new InMemoryUserDetailsManager();
        manager.createUser(User.withUsername("javaboy").password("123").roles("admin").build());
        return manager;
    }

    @Override
    protected void configure(HttpSecurity http) throws Exception {
        http.authorizeRequests()
                .antMatchers("/vc.jpg").permitAll()
                .anyRequest().authenticated()
                .and()
                .formLogin()
                .successHandler((req, resp, auth) -> {
                    resp.setContentType("application/json;charset=utf-8");
                    PrintWriter out = resp.getWriter();
                    out.write(new ObjectMapper().writeValueAsString(RespBean.ok("success", auth.getPrincipal())));
                    out.flush();
                    out.close();
                })
                .failureHandler((req, resp, e) -> {
                    resp.setContentType("application/json;charset=utf-8");
                    PrintWriter out = resp.getWriter();
                    out.write(new ObjectMapper().writeValueAsString(RespBean.error(e.getMessage())));
                    out.flush();
                    out.close();
                })
                .permitAll()
                .and()
                .csrf().disable();
    }
}
这里的代码我稍作解释:
- 我们需要提供一个 MyAuthenticationProvider 的实例,创建该实例时,需要提供 UserDetailService 和 PasswordEncoder 实例。
- 通过重写 authenticationManager 方法来提供一个自己的 AuthenticationManager,实际上就是 ProviderManager,在创建 ProviderManager 时,加入自己的 myAuthenticationProvider。
- 这里为了简单,我将用户直接存在内存中,提供一个 UserDetailsService 实例即可。如果大家想将用户存在数据库中,可以参考松哥之前的文章:Spring Security+Spring Data Jpa 强强联手,安全管理只有更简单!。
- 最后就简单配置一下各种回调即可,另外记得设置
/vc.jpg任何人都能访问。
好了,如此之后,在不需要修改原生过滤器链的情况下,我们嵌入了自己的认证逻辑。
# 4.测试
好了,接下来,启动项目,我们开始测试。
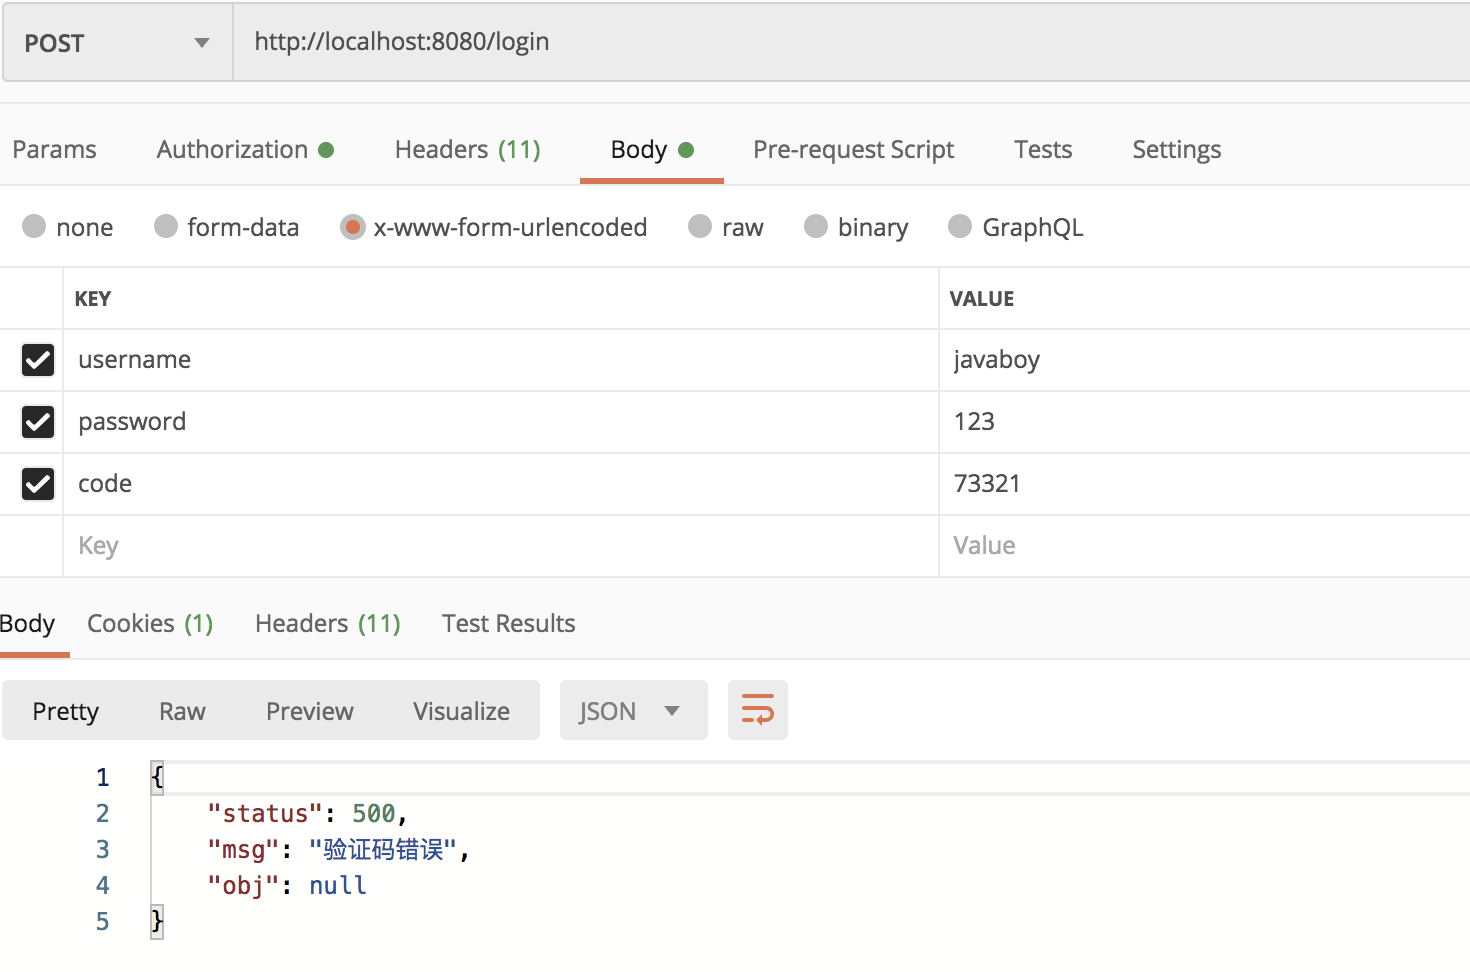
为了方便,这里我就用 POSTMAN 来测试,首先可以给一个错误的验证码,如下:

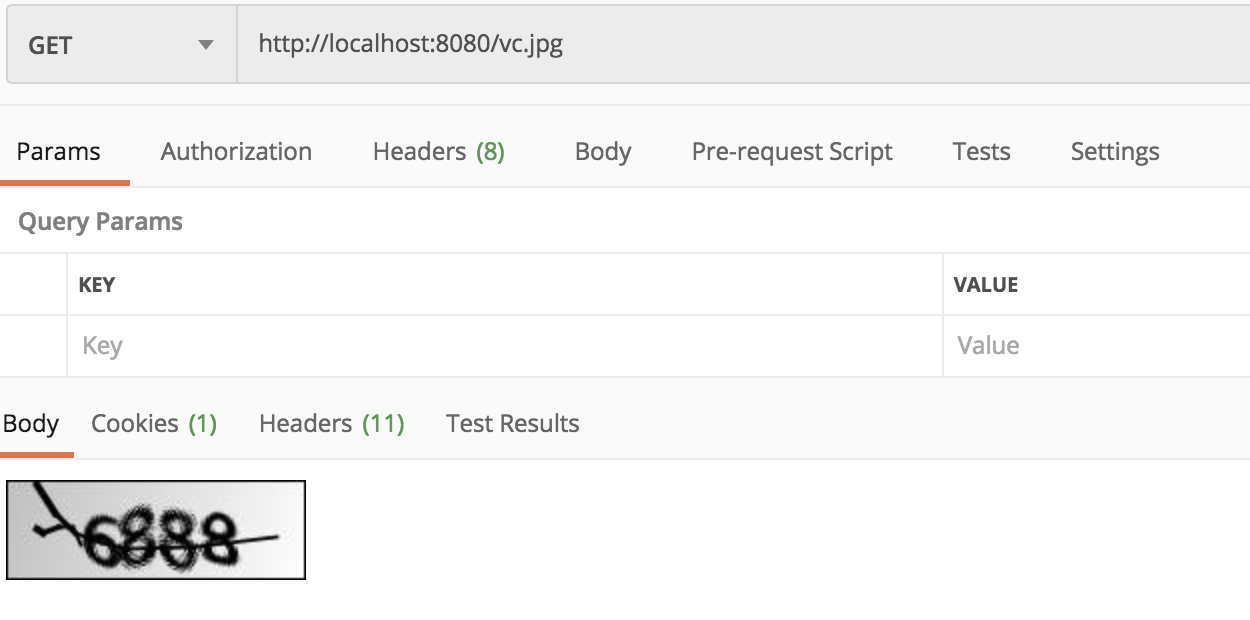
接下来,请求 /vc.jpg 获取验证码:

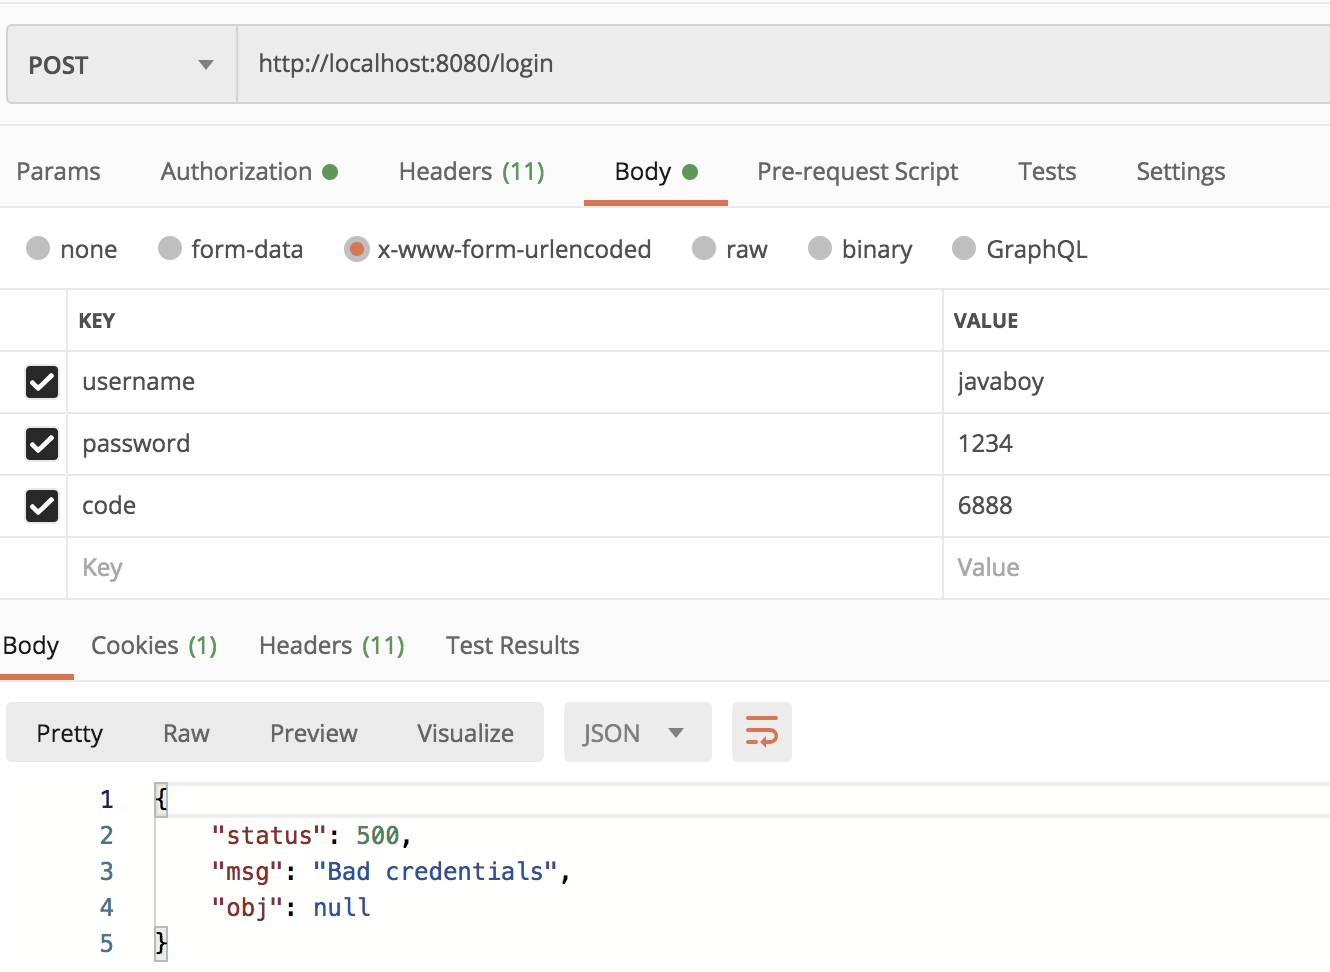
输入正确的验证码和错误的密码,再进行登录:

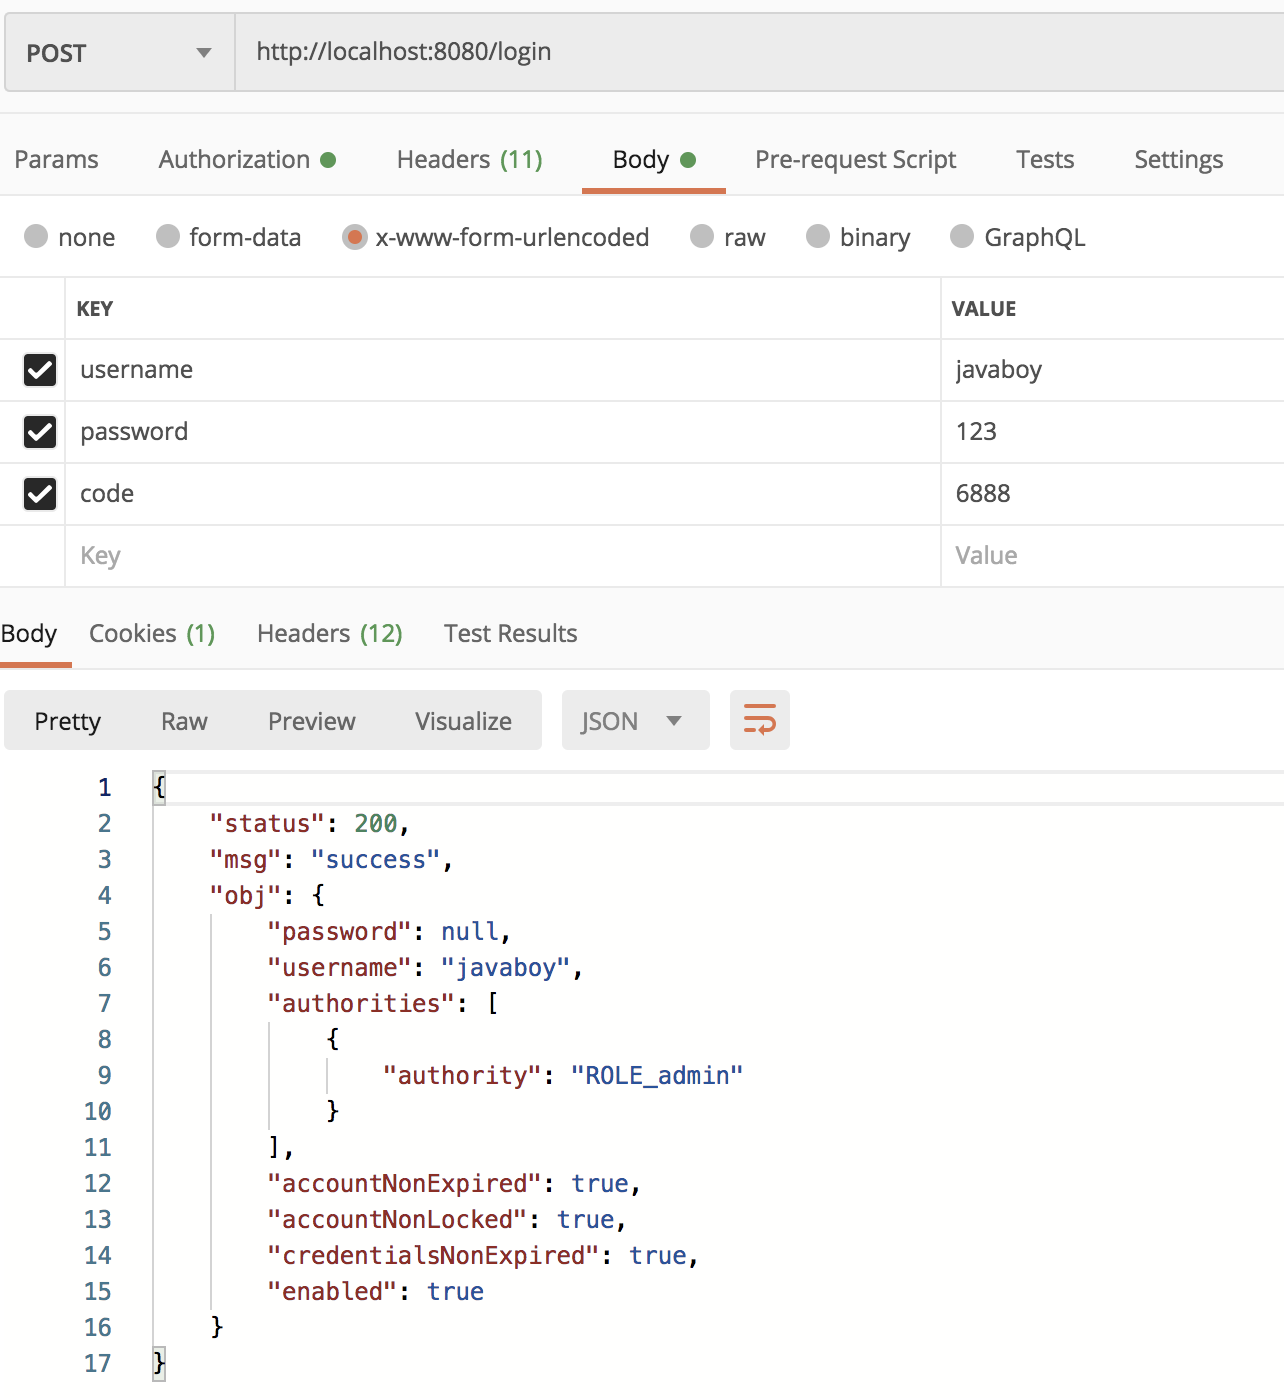
最后,所有的都输入正确,再来看下:

登录成功!
# 5.小结
上面的例子,我使用了添加登录验证码的案例,实际上,其他的登录场景也可以考虑这种方案,例如目前广为流行的手机号码动态登录,就可以使用这种方式认证。
当然,上文的案例还有完善的空间,松哥将在下篇文章继续和大家分享。
本文案例大家可以从 GitHub 上下载:https://github.com/lenve/spring-security-samples。
五一期间码字还是蛮辛苦的,小伙伴要是觉得有收获,记得给个在看鼓励下松哥哦~
大家五一快乐~